Casting a Burnt Wood and Resin Slab
- avodahengineering
- Feb 27, 2020
- 3 min read
Updated: Mar 5, 2020
Resin furniture is an increasingly popular trend in décor industries across the world. Allowing the incorporation of different elements and materials, as well as endless colour possibilities, resin furniture can be manufactured to suit nearly any style or theme. Minimalist-, industrial-, Scandinavian-, modern-, and bohemian styled interiors can all benefit from a resin piece specifically tailored to reflect a particular ‘look’.
Our fascination with resin furniture came as a by-product of work with composite structures in an engineering environment. Constructing resin furniture combined expertise with our love of incorporating natural wood elements into our designs. Resin casting enables us to utilise raw wood elements ‘as is’ without compromising the structural integrity of the furniture.

A personal favourite, the ‘resin and burnt wood’ coffee table top is a good example of one of the many possibilities when it comes to resin furniture. We discovered a nicely scorched wood slab on the discard pile at a timber yard in the Lowveld, and instantly fell in love with the distinct ember patterns left by the flames. The slab was somewhat undersized and preserving the burnt look without the soot giving off on contact would have been a challenge. However, by casting the slab in resin we could increase its size as well as encapsulate the burnt elements without risking soot stains and splinters. Below are the steps we took to turn our idea into reality:
Step 1: Building a casting mould
We used melamine planks (plywood can also be used) to build a casting mould specific to our size requirements (920mm x 550mm x 70mm). The planks were fastened in place with screws and the seams were then sealed with silicone.

Sealing the seams of the casting mould with silicone.
Step 2: Finishing off the wood slab
A grinder with a wire brush attachment was used to remove excessively burnt and brittle areas of the slab. The unburnt surfaces were sanded (up to 240 grit) to enhance the wood’s beautiful grains and colours.
Step 3: Pre-casting preparations
The casting mould was wiped clean, and a non-stick coating applied (we used Ram Wax) to ensure easy removal after curing. We used a hairdryer to remove dust and soot from the cracks and crevices in the wood and a microfiber cloth to wipe the surface of the slab, before placing it in the casting mould. A clean, dust-free environment is absolutely essential when casting resin.
Step 4: Mixing the resin and hardener
The quality of the resin used will impact the final appearance of the product. High quality resin is relatively expensive, but is necessary for the success of the process. We used an epoxy casting resin – a resin particularly suited to the task at hand. The resin and hardener were mixed in a plastic tub according to product instructions – precision is of the utmost importance to this step!
Step 5: Casting
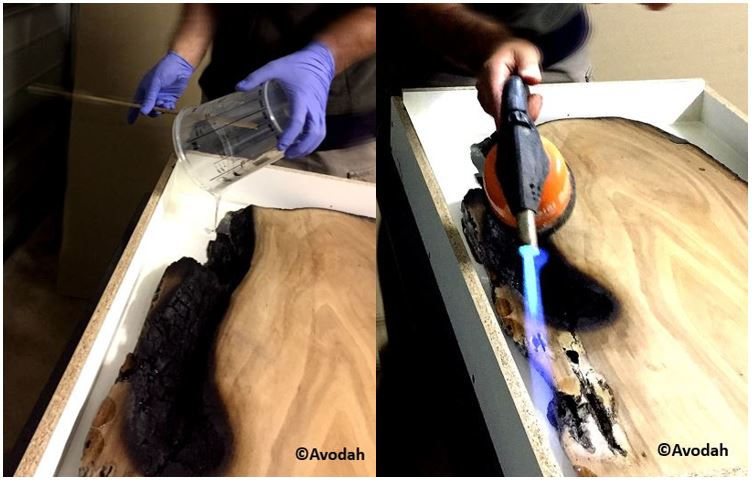
The resin was cast in three layers, allowing each layer to cure before casting the next. Casting the entire slab in one layer increases the risks of cracking due to excessive heat generated in the curing process. We used a blowtorch to remove air bubbles released from the wood during casting (although a few bubbles persisted).

Casting the first layer (left) and removing air bubbles (right).
Step 6: Removal from the mould
After allowing the resin to cure (approximately 48 hours in total), we removed our resin and burnt wood slab from the casting mould by lightly tapping the sides of the mould with a hammer.

Curing - notice the air bubbles on the surface. The casting/curing process took about 48 hours
Step 7: Finishing the resin and burnt wood slab
The final step was to sand down and then polish the slab to the desired smoothness (up to 600 grit). We also rounded the edges to obtain a softer look. The final step greatly contributed to the quality of the product, and was also the most time consuming. We purposely chose a more opaque finish (by not sanding the bottom of the slab as much), but one could also opt for a clear finish which would give the impression of wood cast in glass.

Sanding and polishing. We also rounded the edges for a smoother appearance.
The resin and burnt wood slab was mounted on custom made steel X-legs to produce a coffee table that combines elements of the natural world with a modern industrial style. The possibilities are endless when it comes to resin pieces, and we will definitely incorporate it in select future designs. Do you have a vision of a resin furniture or decorative piece? Get in touch to discuss how we at Avodah can make your décor dreams come true!


Find the best furniture shops in Lahore at Tarkhan.pk. Their designs are elegant and durable."